The vinyl roof was showing signs of blistering in several locations, so had to come off.

There were ominous-looking bubbles under the vinyl roof liner - at first I thought I might get away with just peeling up the vinyl and doing spot repairs, but it became obvious that the whole thing would have to come off in order to do a proper job because there were dodgy spots in several areas. Still - it all looked pretty minor.
The windscreen had to come out anyway because it was leaking badly.

A PO (previous owner) had attempted to seal the leaks by pumping silicone and some kind of mastic around the windscreen trim. To my experience, this NEVER works - or at least not for long, and all it does is create more moisture & debris traps which cause more problems. It also makes it much more difficult to remove the trim.
So - carefully does it by cutting away as much of the sealant as I could, then using my home-made special tool to release the clips. {photo of tool}
You have to go easy here, because it is very easy to kink the trim if you pull on it too much.

***Just a note here: If you do get a modern replacement screen fitted to an older car, make sure the fitter knows what they're doing. Due to the new ones being thinner, unless they are packed out further by the seal the windscreen trim will fit very proud of the glass and it is not a good look. Also allows more debris to get between the glass & trim.***

Peeling up the vinyl, I was relieved to find that most of the bubbling spots were just surface corrosion. Even the worst looking areas were ok once all the accumulated gunk & debris was cleaned out.


So the vinyl peeling went on towards the back. It was interesting to note where the roof had started rusting along the scribe-lines that the vinyl fitters must have scratched into the roof paint. (right).
This involved removing the rear screen as well - I had hoped to get away without pulling the rear screen because there were no obvious signs of rust around the frame. Anyway, it had to come out in order to remove the vinyl - and, as it turned out, it was lucky I did ...
WHEN WILL I EVER LEARN??


Eek! I should have known from the excess sealer that there would be "issues" with the window frame, but it was a nasty surprise to see just how extensive the rust was in this area - especially as it was all but invisible with the vinyl in place.
So, there we have it - Vinyl - Bloody - Roof - Linings; they not only trap moisture and cause the roof to rust (especially where the "pro" fitters have scratched scribe marks in the paint), but also cover up the corrosion until it gets very bad. Even without the added aggravation of the vinyl, these XC's have areas in the frame that are triple-skinned (i.e. 3 layers of sheetmetal spot-welded together), and this is where rust takes hold.

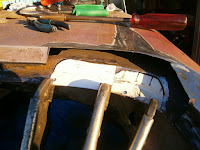
Removing the boot lid (and torsion bars for the hinges) made it a lot easier to access the middle part of the screen frame. There are also rusty areas on the boot lip which will need attention.
 I partially drilled-out the spot welds so I could get the trusty air chisel in between the layers. This makes short work of separating (intact) seams, but real care must be taken because it's easy to damage sound metal if you get carried away.
 The spot-welded layers are a prime place for rust to start if the joints are not sealed properly - and sealing on the XC is poor to non-existent. You can see here where I have cut away to top layer of metal from the top left corner all the way across the roof. What's left is the inner skin, plus another layer of roof bracing. This is all pretty good on the left side.
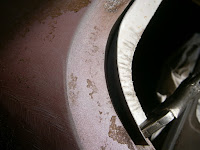
However, on the right side with the outer skin cut away, you can see that the inner frame and the roof brace are both badly rusted - although it is fairly localised and at least I still have the shapes to work with.

Of course, all the rust and corrosion must be cut out until there is sound metal to weld to.
I had to cut out some more of the sound outer layer in order to get access to the rusted strengthening layer.
First a patch for the inner frame (on the right) and then another for the brace (on the left). Looks like a large gap around the edge in places, but once they are properly positioned and edges are flush, they are a pretty good fit. These are stitched in place because it is very hard to run a contiuous bead on thin sheetmetal without distorting it and/or blowing-through.

And here they are welded in place. These are inner skins so, although it is important for them to be strong, cosmetics are not important. My strategy is to do all the hidden stuff first so hopefully my welding skills will improve with practise before tackling the outer skin.

On the LH side I had to cut out some of the pillar vent frame, as well as the outer and some of the inner layer of the rear screen lip.

And here it is with the frame repaired. The "spot welds" are now actually plug welds. I use a pneumatic punch to put holes in the new metal, then plug weld them in place and grind off the excess. Check out my new welding (flame resistant) blanket (in black) I really don't want to be setting anything on fire ....

Mid-upper part of the window frame was rusted in the middle bracing layer, as well as the outer skin of the lip. You can see all 3 layers of the window frame in this shot.

 And here we have the middle bracing layer stitched in place before the outer skin goes on. Man, this is sucking up some time! Note
the punched holes along the lip for plug welds.
You can see my air-powered panel saw on the roof at left. This is great for cutting sections out accurately and with a narrow cut line. I'm also using 0.8mm cutting discs on the angle grinder.


On the upper corner sections I am using a cardboard template to guide me. A good fit is essential here because this is the outer layer that the screen seals against.


Using the template means I don't have to run back & forth to the car whilst forming the bend. You can see here how it takes shape.

And behold! My secret weapons. A brand new set of shrinker-stretchers from Eastwood. These work by crimping or spreading the flat metal to make a curve. Holy shit - spending some real bucks on equipment now!
I've mounted them on my wheeled welding bench so I can have them near the job at hand.
 I had to cut the upright part of the angle to spread it slightly because
the angle of the frame on the corners is less than 90 degrees. These cuts will be stitched together once the patch is in place.
You can see (at right) that the patch is a perfect flush fit for the original panel - that is, they will be butt-welded into place with no (rust prone) overlaps.

Middle upper outer skin stitched in place. Just a patch on the upper right outer - where I had to cut it out for access to the inner layers - and the frame is done.

All fixed up. There was a bit of work with the grinder to knock high points off, but now ready for etch primer. I am going to seal the insides of these patches with an anti-corrosive cavity oil after the outside has been primed and filled. It is impossible to access the back of most of these patches because of the multiple layers - BUT there are holes in the inner panels that will allow my cavity spray gun with a flexible hose to get right in there.

 Now a job I've been putting off - removing all the old glue stuck to the roof. I tried many different methods, but in the end it was a rag soaked in paint thinner and good old elbow grease that did the trick. Took a while, but came up good with no extra damage to the sound areas of paint.

Of course, all the rust and corrosion must be cut out until there is sound metal to weld to.
I had to cut out some more of the sound outer layer in order to get access to the rusted strengthening layer.

First a patch for the inner frame (on the right) and then another for the brace (on the left). Looks like a large gap around the edge in places, but once they are properly positioned and edges are flush, they are a pretty good fit. These are stitched in place because it is very hard to run a contiuous bead on thin sheetmetal without distorting it and/or blowing-through.

And here they are welded in place. These are inner skins so, although it is important for them to be strong, cosmetics are not important. My strategy is to do all the hidden stuff first so hopefully my welding skills will improve with practise before tackling the outer skin.

On the LH side I had to cut out some of the pillar vent frame, as well as the outer and some of the inner layer of the rear screen lip.

And here it is with the frame repaired. The "spot welds" are now actually plug welds. I use a pneumatic punch to put holes in the new metal, then plug weld them in place and grind off the excess. Check out my new welding (flame resistant) blanket (in black) I really don't want to be setting anything on fire ....

Mid-upper part of the window frame was rusted in the middle bracing layer, as well as the outer skin of the lip. You can see all 3 layers of the window frame in this shot.

 And here we have the middle bracing layer stitched in place before the outer skin goes on. Man, this is sucking up some time! Note
 the punched holes along the lip for plug welds.
You can see my air-powered panel saw on the roof at left. This is great for cutting sections out accurately and with a narrow cut line. I'm also using 0.8mm cutting discs on the angle grinder.


On the upper corner sections I am using a cardboard template to guide me. A good fit is essential here because this is the outer layer that the screen seals against.


Using the template means I don't have to run back & forth to the car whilst forming the bend. You can see here how it takes shape.

And behold! My secret weapons. A brand new set of shrinker-stretchers from Eastwood. These work by crimping or spreading the flat metal to make a curve. Holy shit - spending some real bucks on equipment now!
I've mounted them on my wheeled welding bench so I can have them near the job at hand.

 I had to cut the upright part of the angle to spread it slightly because
 the angle of the frame on the corners is less than 90 degrees. These cuts will be stitched together once the patch is in place.
You can see (at right) that the patch is a perfect flush fit for the original panel - that is, they will be butt-welded into place with no (rust prone) overlaps.

Middle upper outer skin stitched in place. Just a patch on the upper right outer - where I had to cut it out for access to the inner layers - and the frame is done.

All fixed up. There was a bit of work with the grinder to knock high points off, but now ready for etch primer. I am going to seal the insides of these patches with an anti-corrosive cavity oil after the outside has been primed and filled. It is impossible to access the back of most of these patches because of the multiple layers - BUT there are holes in the inner panels that will allow my cavity spray gun with a flexible hose to get right in there.

 Now a job I've been putting off - removing all the old glue stuck to the roof. I tried many different methods, but in the end it was a rag soaked in paint thinner and good old elbow grease that did the trick. Took a while, but came up good with no extra damage to the sound areas of paint.
Nice score Hugo. This is the GXL model XC Fairmont with the optional vinyl roof. I personally like them but they need to be looked after. I see the high back seats and you talk about the different wheels but the bonnet looks like it has been changed losing the twin air scoops for the GXL model. I will try and send you a link to the wheels for that 1977ish model as found it interesting.
ReplyDelete